User Guide
Everything you need, from installing SplashReel to walking away with a finished reel. First time through, follow it in order. About seven minutes to read.
Which parent are you?
- You're the one tagging (the iPad is in your hands): read the whole guide. A few minutes now save you the first quarter.
- You're filming with your phone: you don't need this guide at all. Someone asked you to film is the short page written for you, and it's the one to send round the team.
- Your iPad just died: your phone can take over the tagging. Same screens, same buttons, a bit more scrolling. Turn Record video on this device off and let a phone keep filming, and carry on from section 4.
- You just want your kid's reel: nothing to install. The tagger sends it to you after the game, like any video, and this page answers the rest. If you're the one with the iPad and you only want your own kid's highlights, section 6 is the short version.
- You already have the video: you filmed it the ordinary way, or it's been sitting in Photos since last season. Nobody has to tag live. Start at section 8.
Three words, so the counts make sense
- A moment is one thing you tagged. Tap TAG and you have a moment. Every count of what you tagged says moments: the games list, the blue needs-details bar, and a game's Delete.
- A clip is the short video cut around a moment, one per camera angle. Film with a second phone and one moment has two clips, so a game can list more clips than moments. A reel uses one clip per moment unless you tick another angle.
- A part is one run of filming, from Start or Resume until Pause or End. Pausing at quarters leaves the full game in several parts, and you can join them back into one video when you save it.
Game-day checklist
The night before: charge the iPad (bring a battery pack), check you have 10 GB free (Settings app → General → Storage), and put your player names in the team roster. A full game is a long time to hold a low battery, and SplashReel now tells you before you start if the one in your hand will not see it out.
At the pool: leave Wi-Fi ON (no network needed), turn on Do Not Disturb so a call doesn't pause your recording, start the game on the iPad first, and prop it where it sees the whole pool. Then read the camera code off the iPad to anyone filming for you.
1 Install from the App Store
SplashReel is a free download on the App Store. Your first two games are free, reels included.
1 Get SplashReel
On the iPhone or iPad you'll film with, open SplashReel on the App Store or search for SplashReel, then tap Get.
2 Open it & allow access
Open SplashReel. The first time, it asks for Camera, Microphone, Photos, and Local Network. Allow all four. It needs them to film, save your clips, and connect extra cameras.

Good to know
- The app runs in landscape, so hold the device sideways.
- Your first two games are free. After that, the Season Pass or Team Season Pass keeps your reels clean. You'll find both in Settings > Access.
- Beta testers keep free access on the device they tested on. If you switch devices, add your email in Settings > Access and we restore it.
- Everything you film stays on your device. Nothing is uploaded.
2 Set up your teams
Do this once. Names make your clips and reels read “#7 Léa” instead of “cap 7”, and every team you cover keeps its own roster.
1 Open your teams
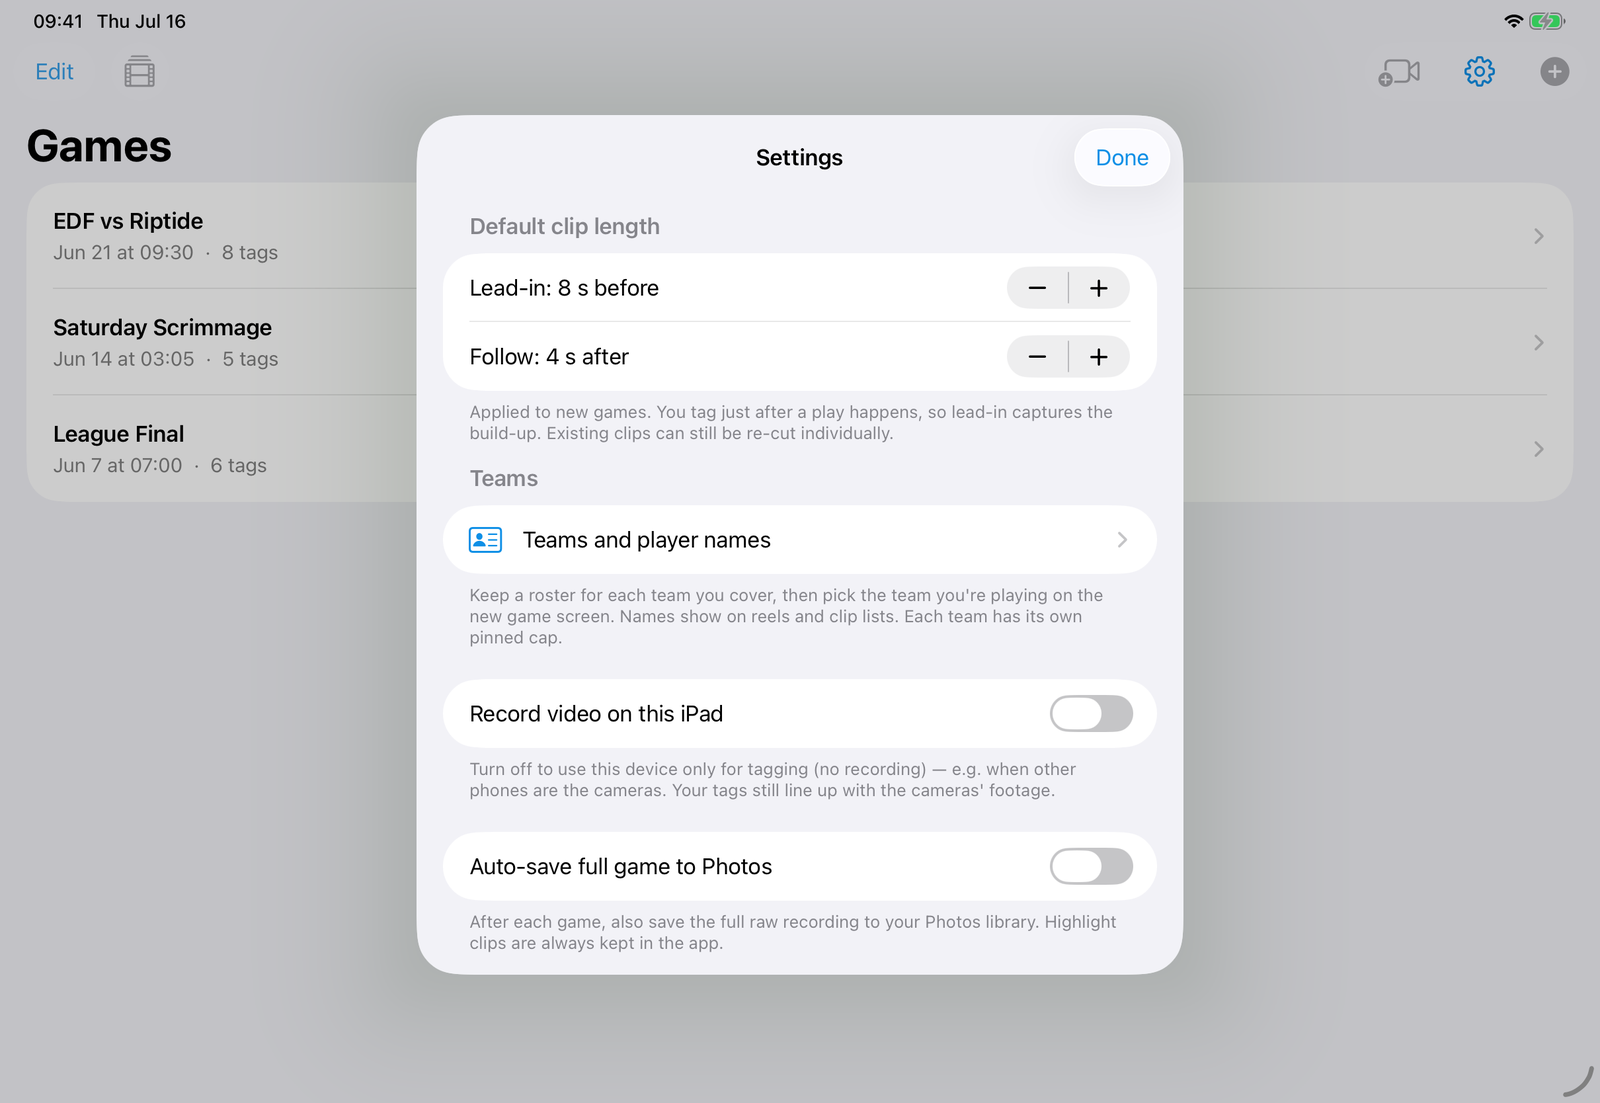
Go to Settings → Teams and player names. Your first team is already there, waiting for its roster.
2 One team per roster
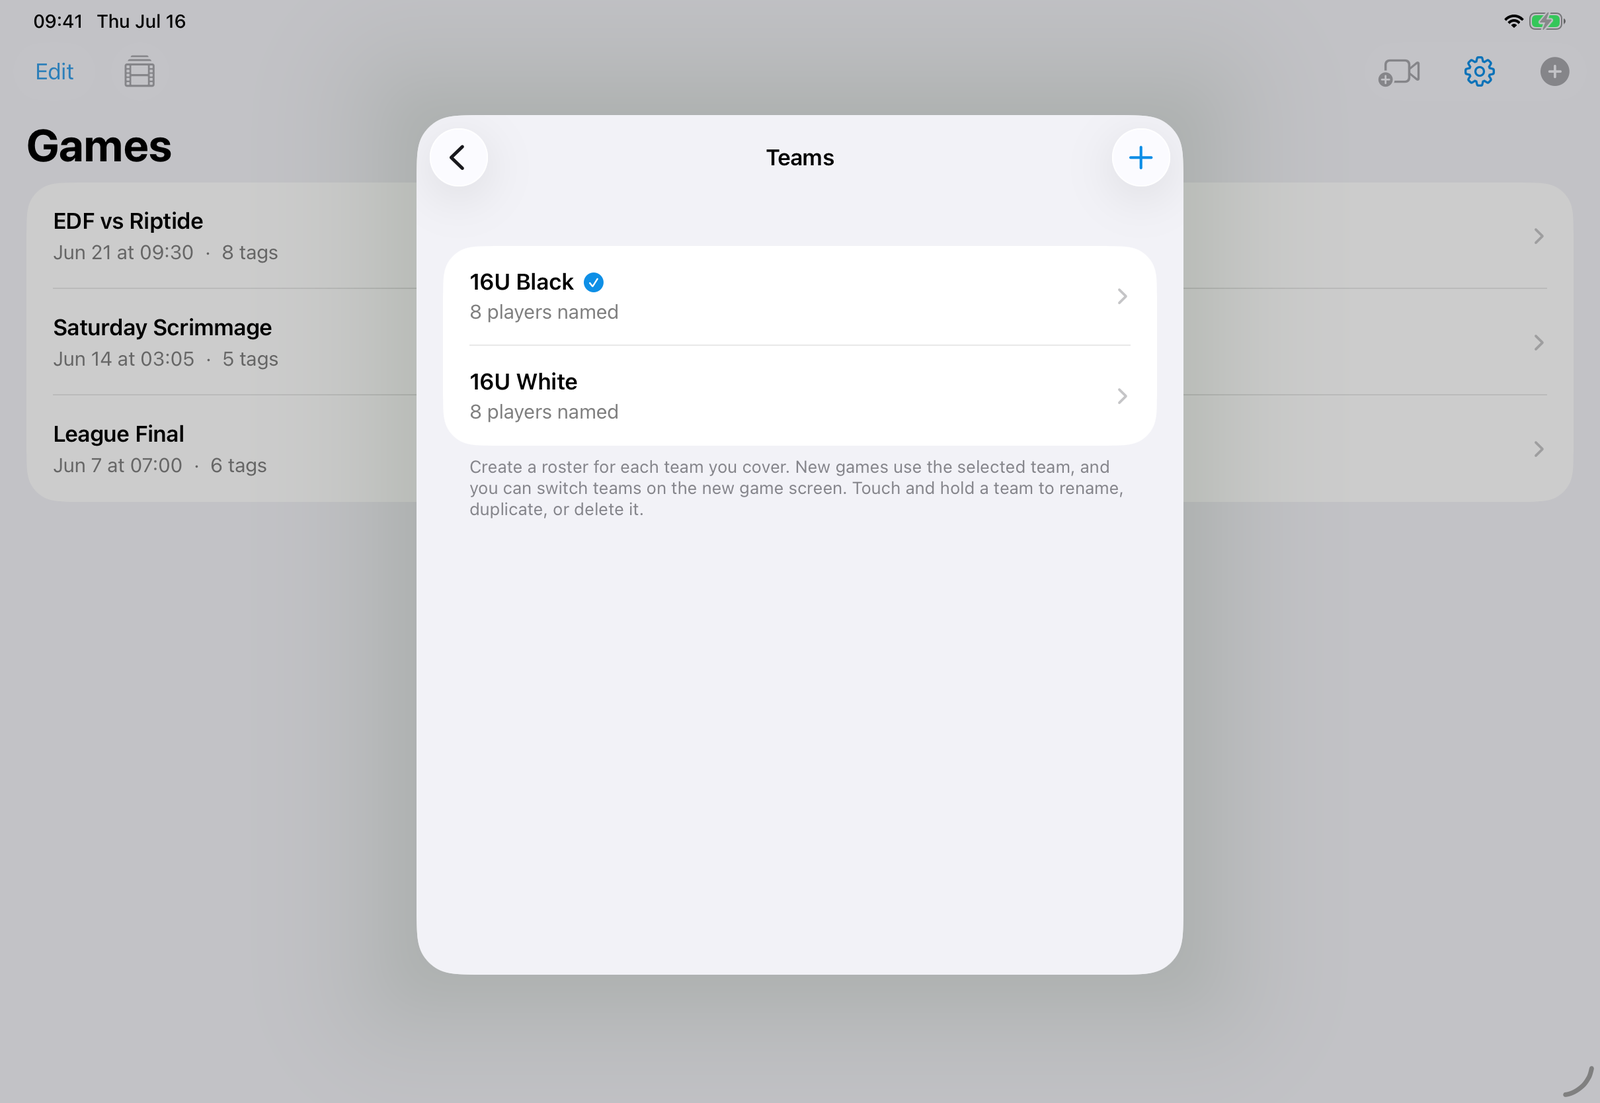
Covering one squad? You already have your team, move on to the names. Covering two, like 16U Black and 16U White, or club and school? Touch and hold a team to rename or duplicate it. Duplicate is the shortcut when the rosters overlap: copy the team, then fix the few names that differ.
3 Name each cap
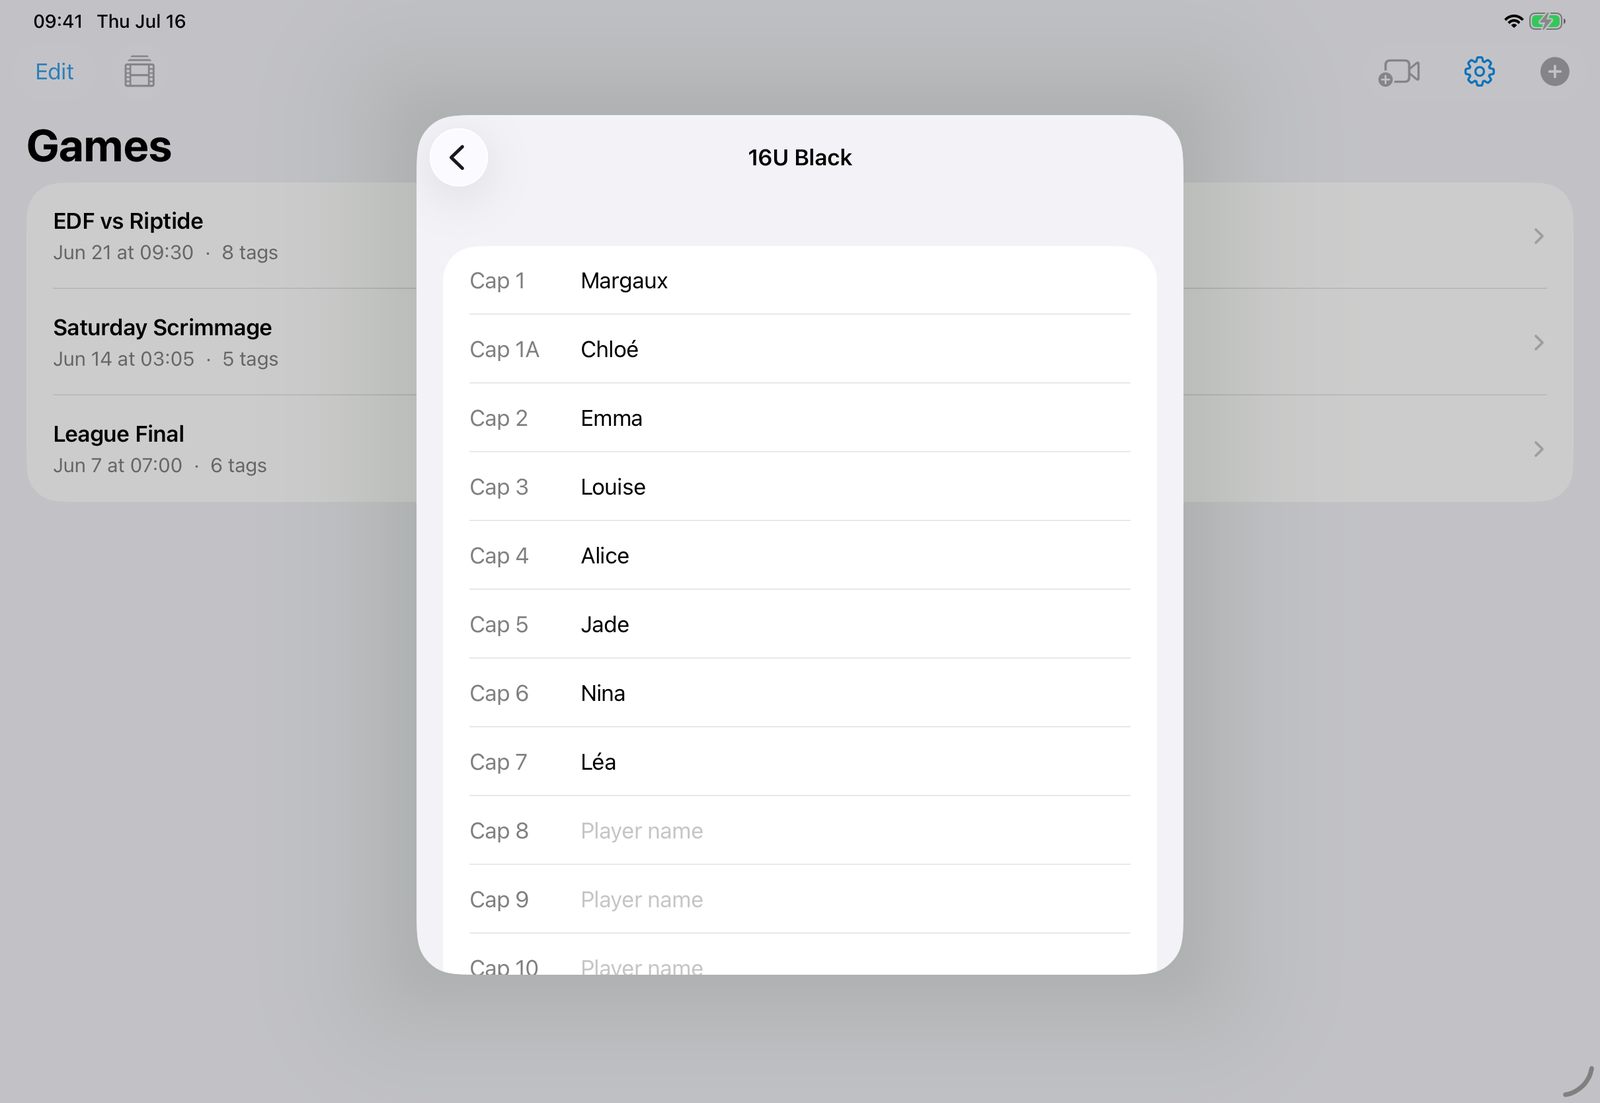
Open a team and type a name next to each cap. Goalkeepers wear 1 and 1A. Field players are 2 to 18. Leave a cap blank and it just shows the number.
4 Pin your player
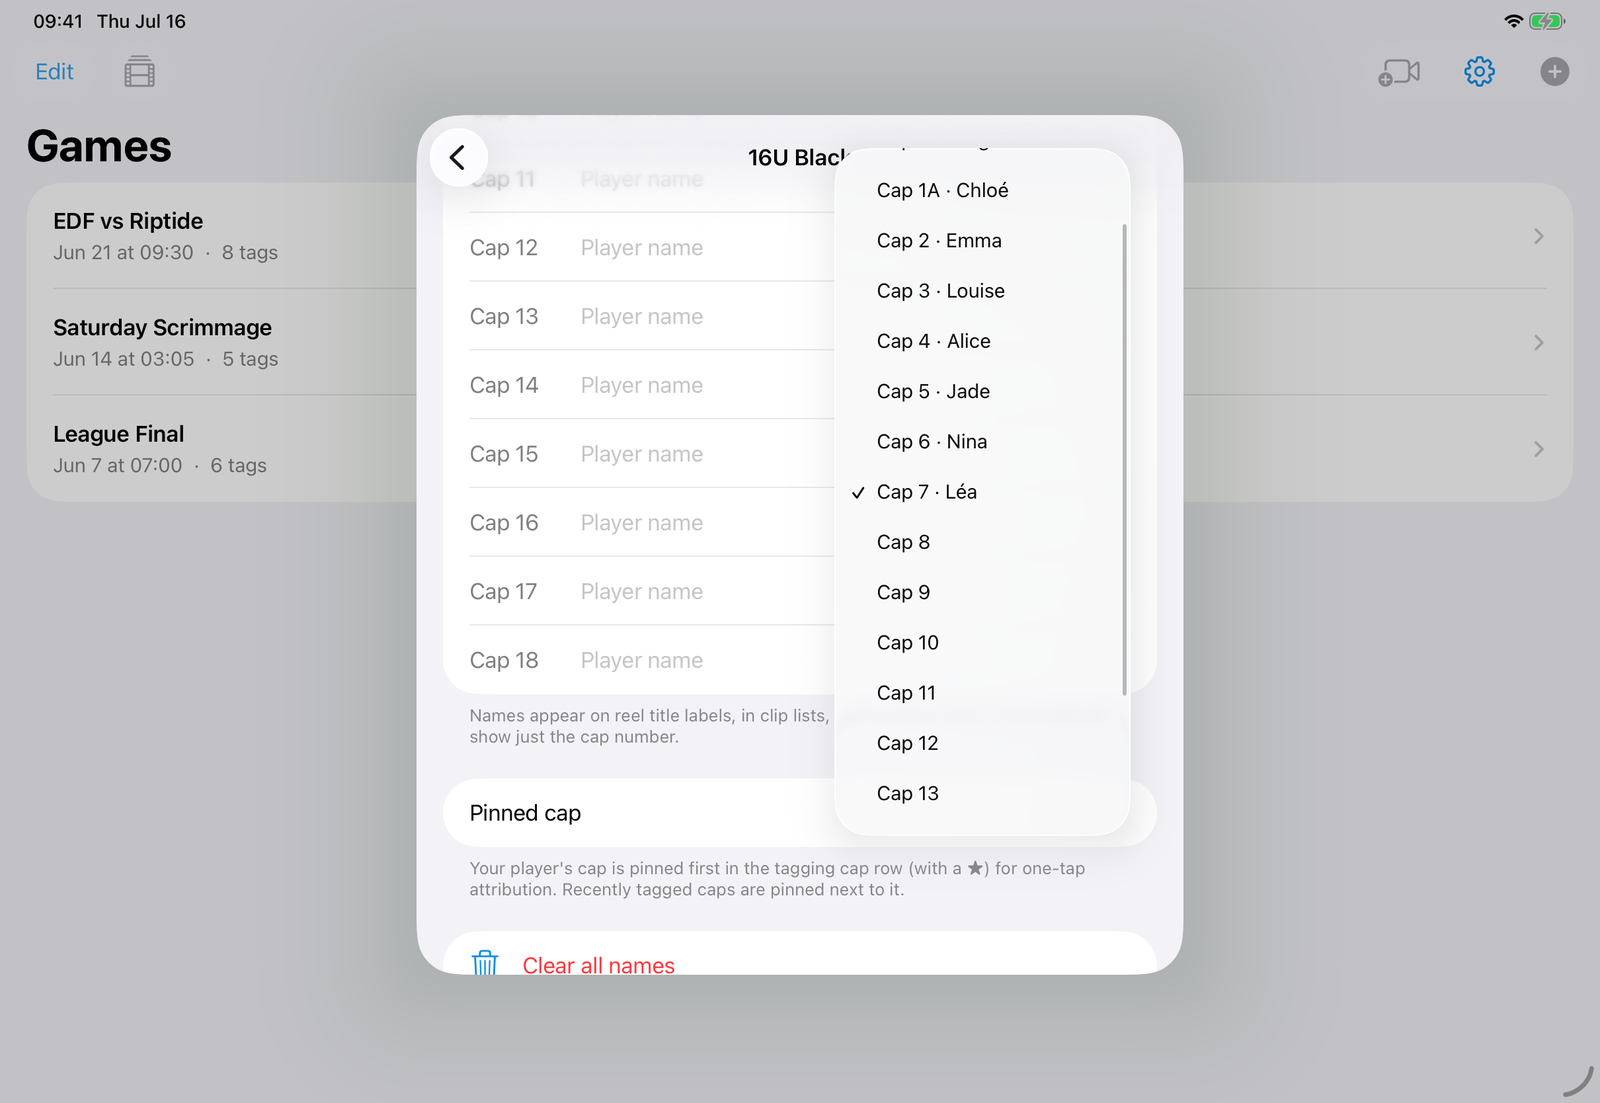
Set the team's Pinned cap (★), at the bottom of the roster. It sits first in the tag row, so tagging your player is one tap without looking. Each team keeps its own, handy when your player wears a different cap on each roster.
5 Pick the team before each game
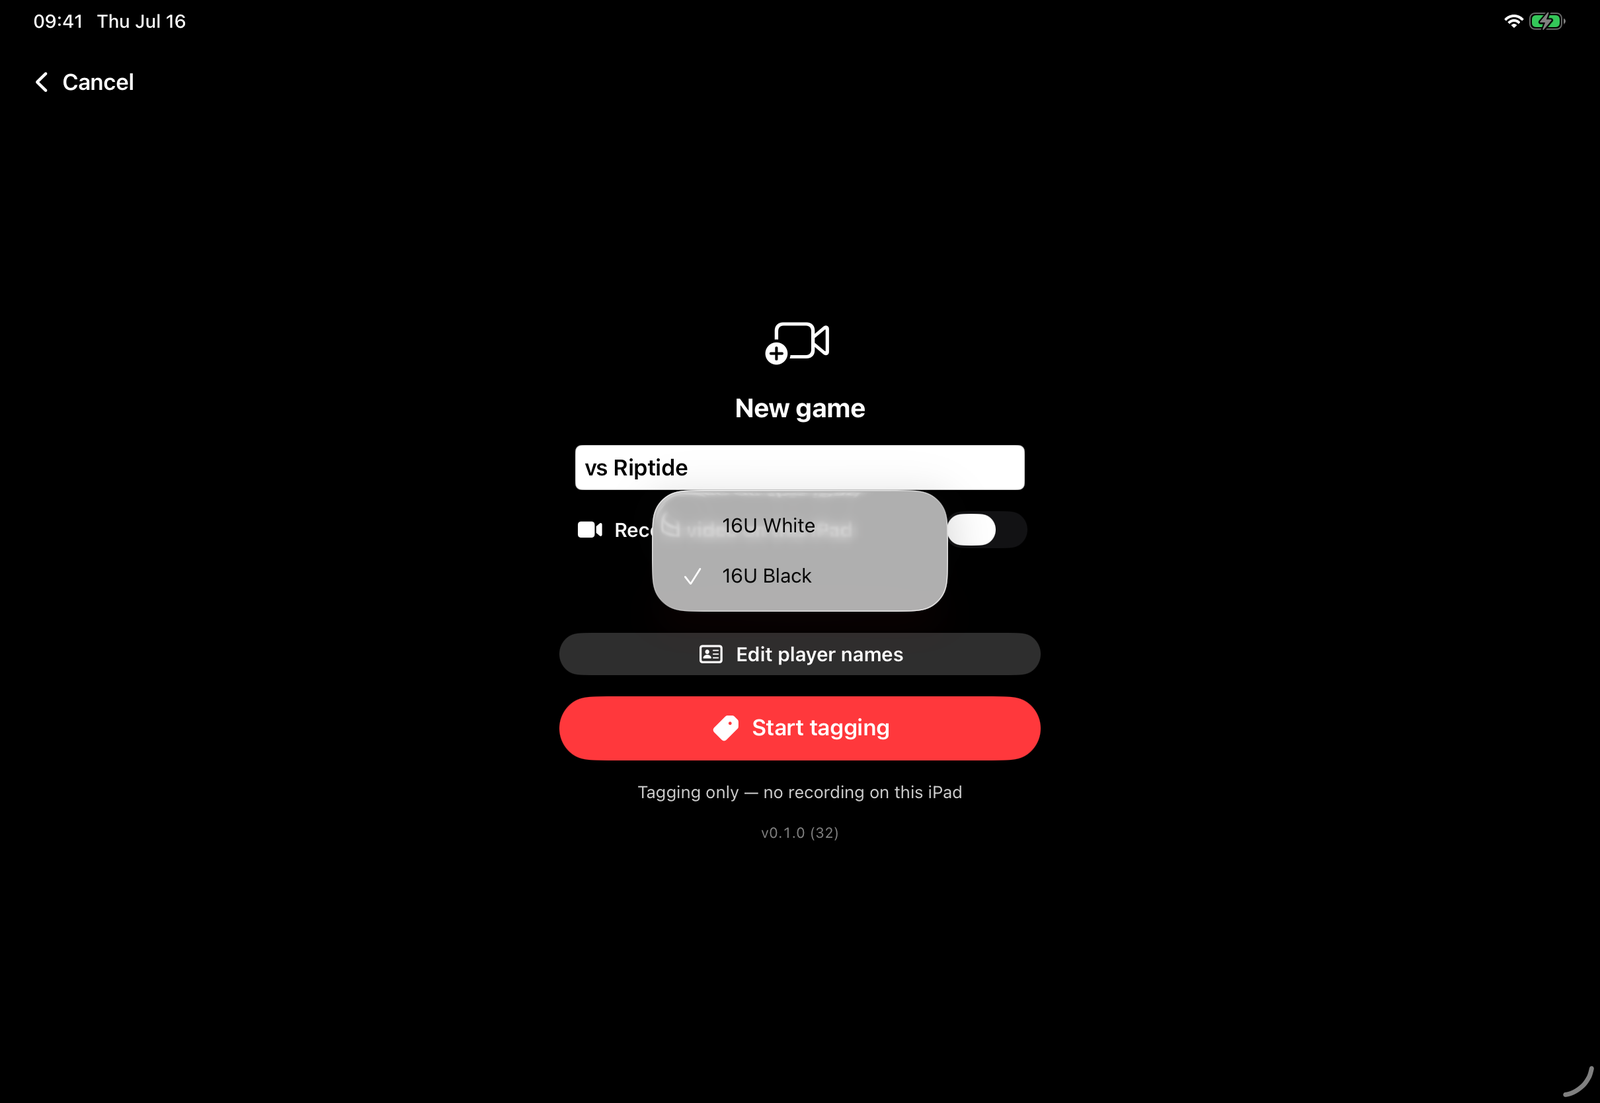
On the new game screen, a Choose roster button appears once you have more than one team, and the game won't start until you pick. That's on purpose: it keeps a rushed start from putting the wrong names on a whole game. Pick who's playing (or No roster for a scrimmage), start the game. Clips, reels, and the games list all use that team's names.
Picked wrong anyway? You can fix it during the game: tap the roster button in the top bar and choose again. Everything you have already tagged moves with it, the caps you tapped stay exactly as they are, and nothing you filmed is touched. Already finished? Open the saved game and tap the Roster button instead. Either way the names update everywhere in the app.
Names stick
Rosters save and come back for every game, so you won't type them again. Each game also remembers the names and team it was played with, so renaming a player, or reworking a roster, never touches your older games.
3 The lay of the land
Four places you'll use again and again.
1 Games
Every game you film lives here. Open one to review clips, build a reel, or find the footage. Swipe a row left, or touch and hold it, to rename or delete that game. A delete always asks first and tells you how many moments and how much video will go, because nothing is backed up anywhere and a deleted game can't be brought back.
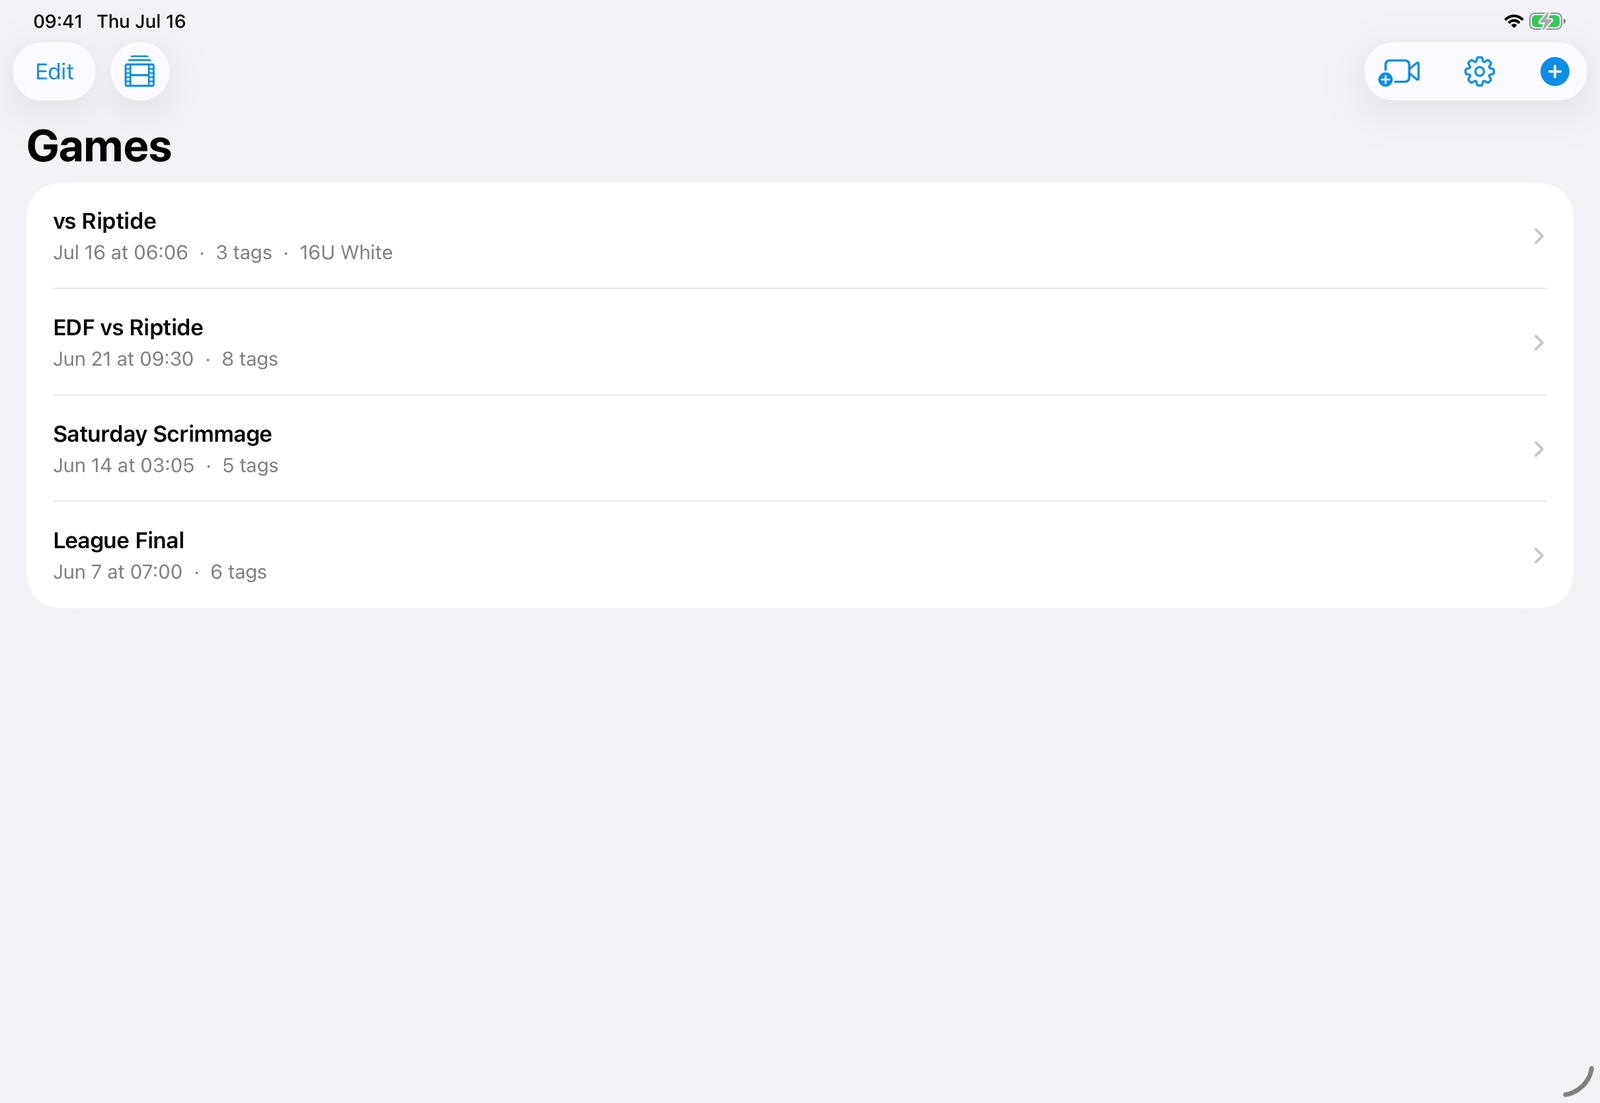
2 Players
A row just above your games. Tap it for one player's highlights across every game they've played, which is the reel worth sending to a coach. Full walkthrough in section 6.

3 New Game
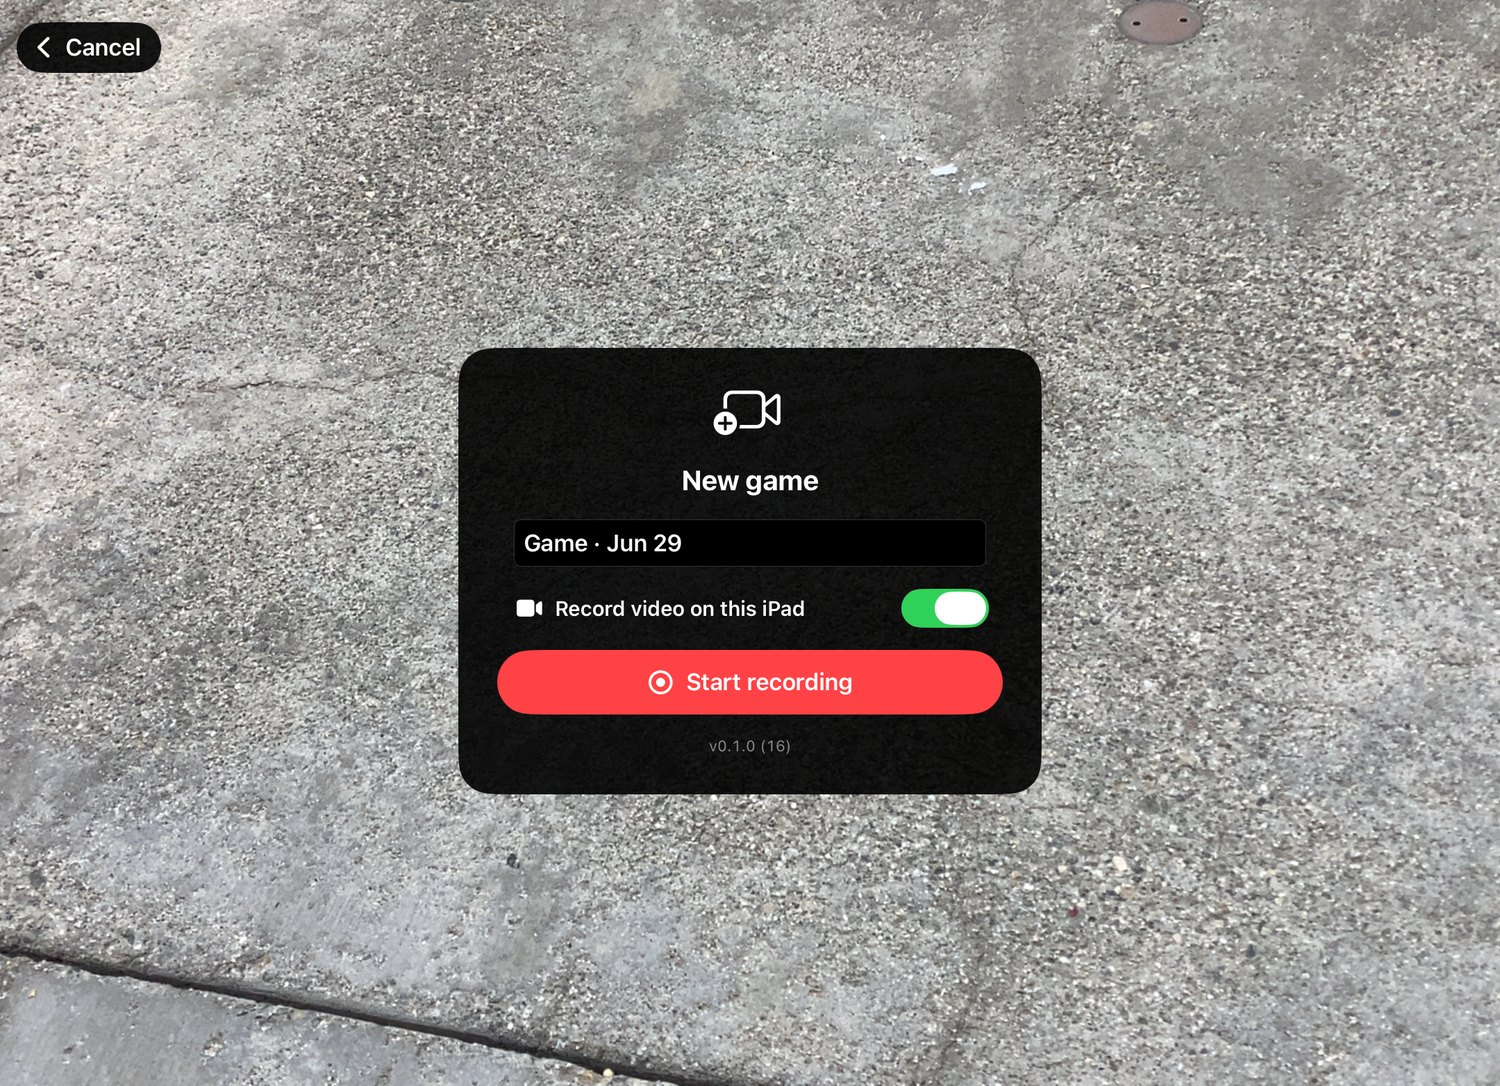
Name the game, choose the roster if you cover several teams (the game waits until you do), and choose whether this device records video. Turn it off to tag only, while the phones do the filming.
Realised mid-game that you picked the wrong roster? Tap the roster button in the top bar and choose again. You never have to end the game and start over.
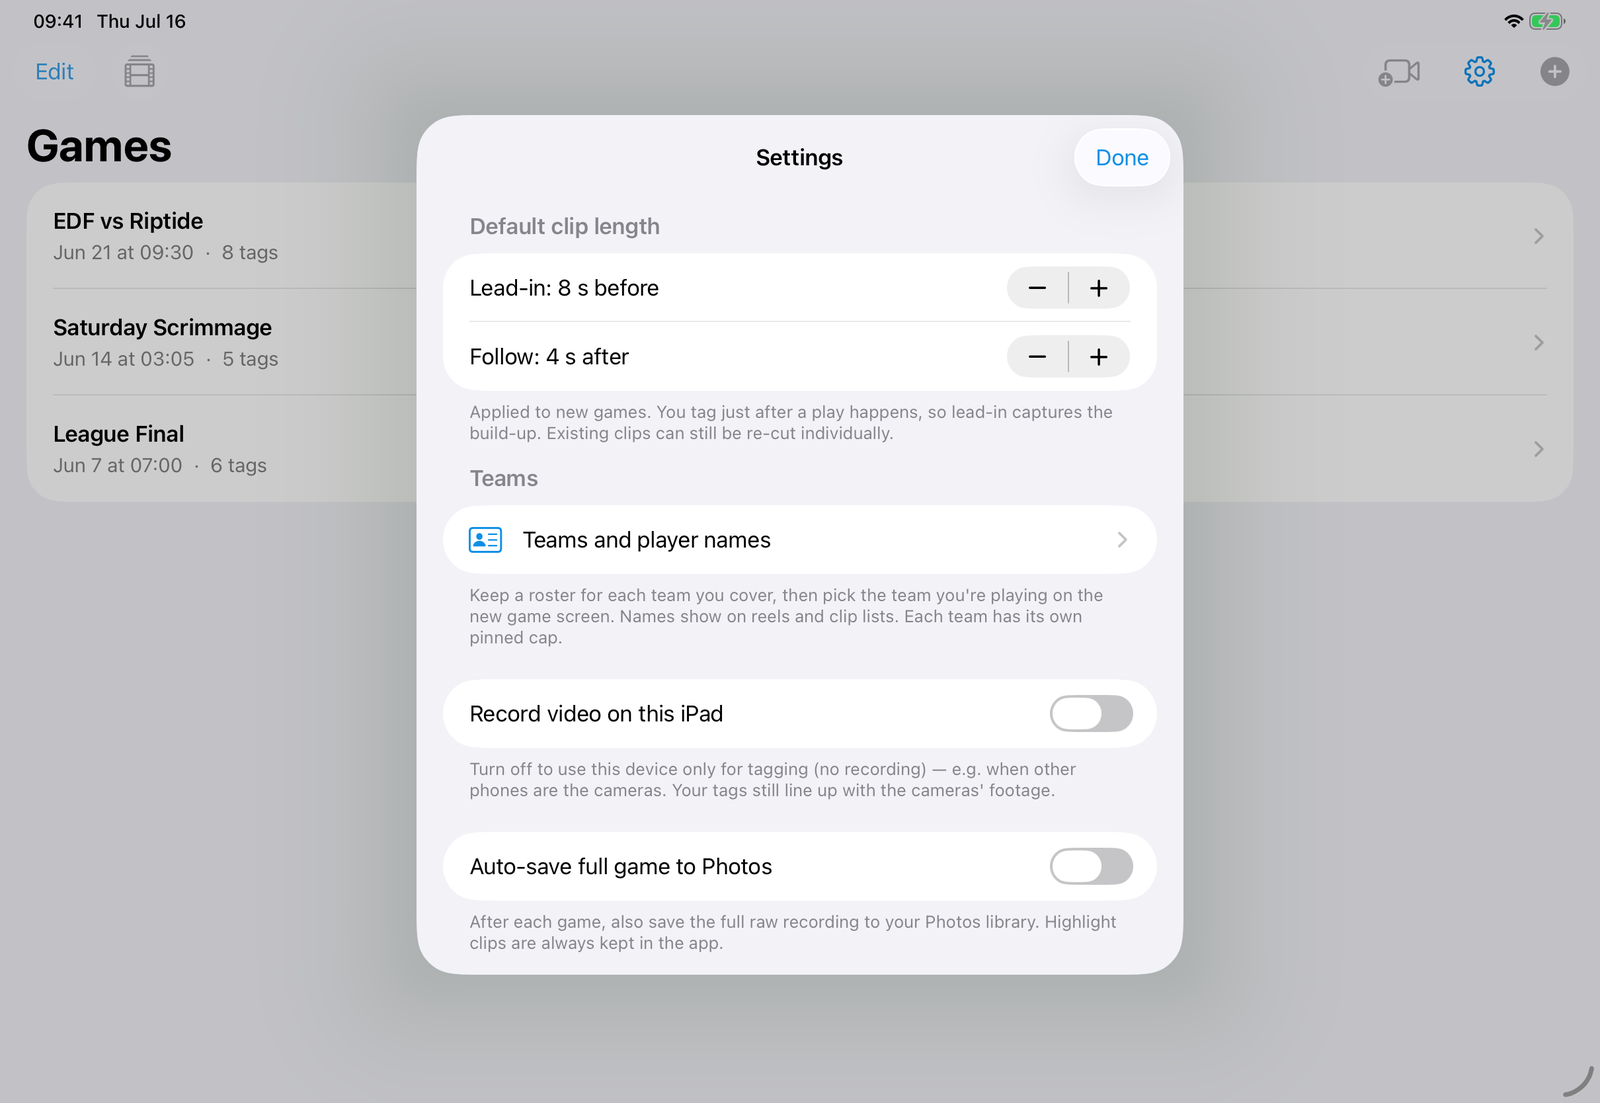
4 Settings
Clip length, your teams and player names, and diagnostics all live here.
4 Capture a game
Watch, tap, label. Do that all game and your reel is mostly built by the final whistle.
1 Start
Tap New game, type who you are Playing, then Start. Prop the iPad where it sees the whole pool. The opponent box starts empty on purpose, and leaving it blank is fine: the game is then listed by its date and time, and you can rename it any time.
The yellow camera code on the card is what phones type to film for you. Read it out before kickoff. It stays in the top bar all game if someone joins late.
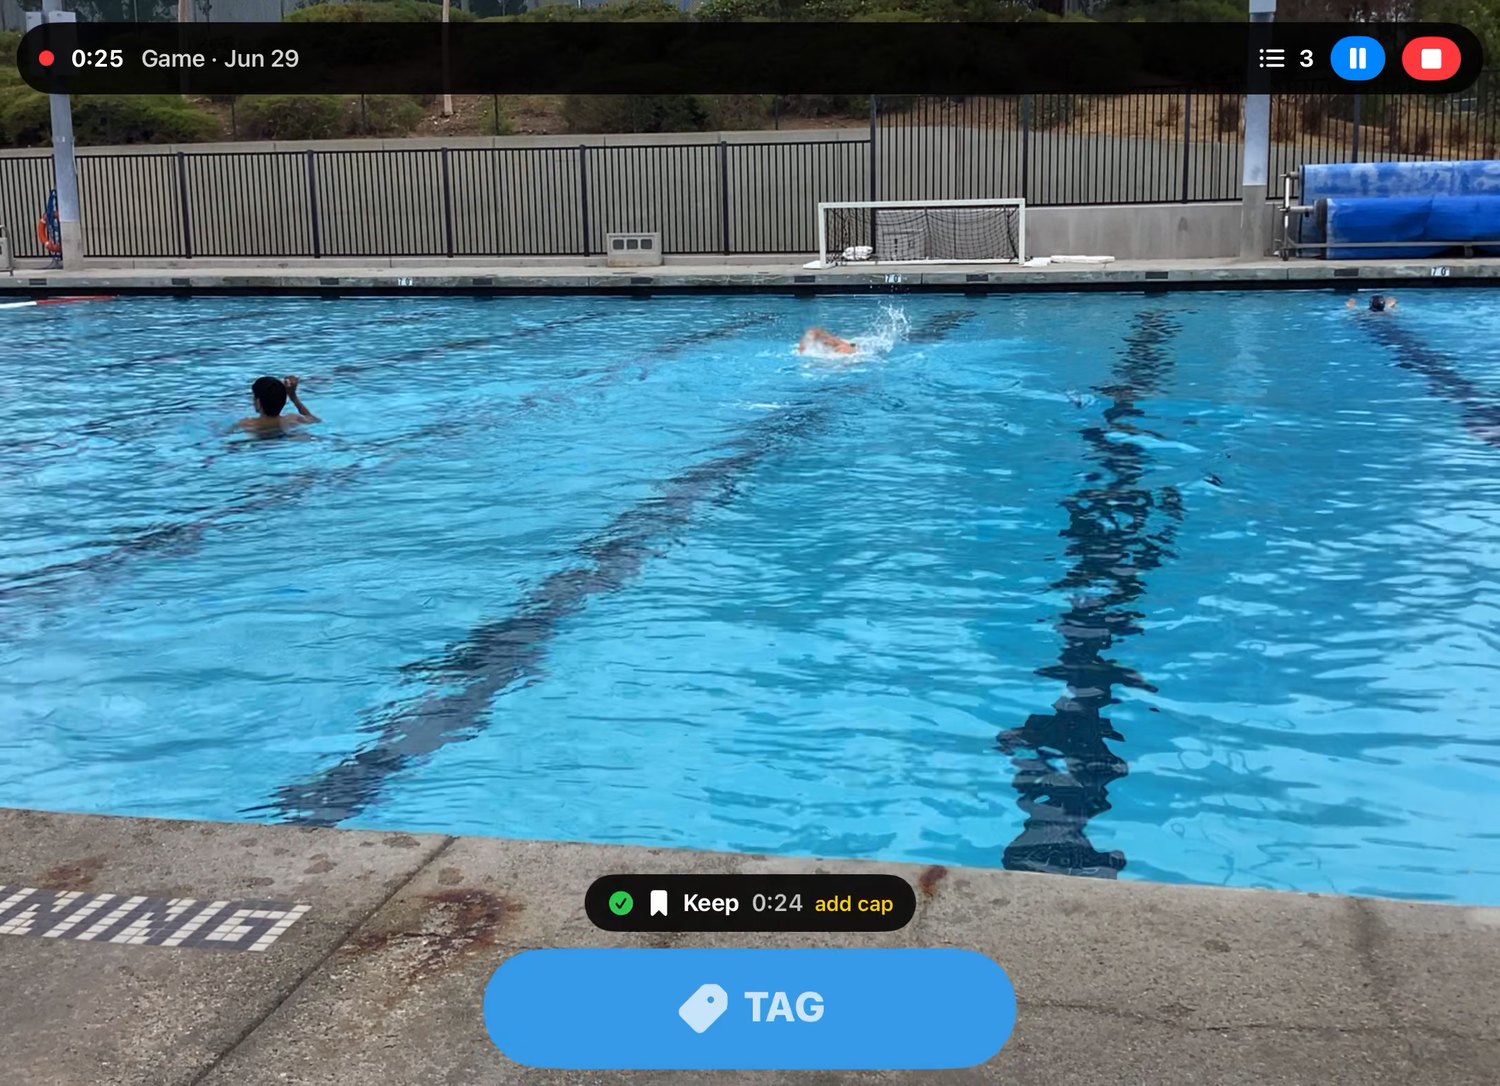
2 Tap TAG the second something happens
Watch the water. The moment there's a goal, a save, or a big steal, tap the big TAG button. It grabs the moment and opens the labels.
3 Pick the play, then the cap
Pick the play. There are two groups: your team's highlights, and things that happened against you. Then tap the cap. For goals and saves, chips appear so you can add the situation: 6v6, 6v5, 5v6, or 5m. Skip them if the game is moving fast. Nothing is guessed for you, and you can fill them in later.
On an iPhone, the Against us events sit behind a small tap, so the common plays stay big.
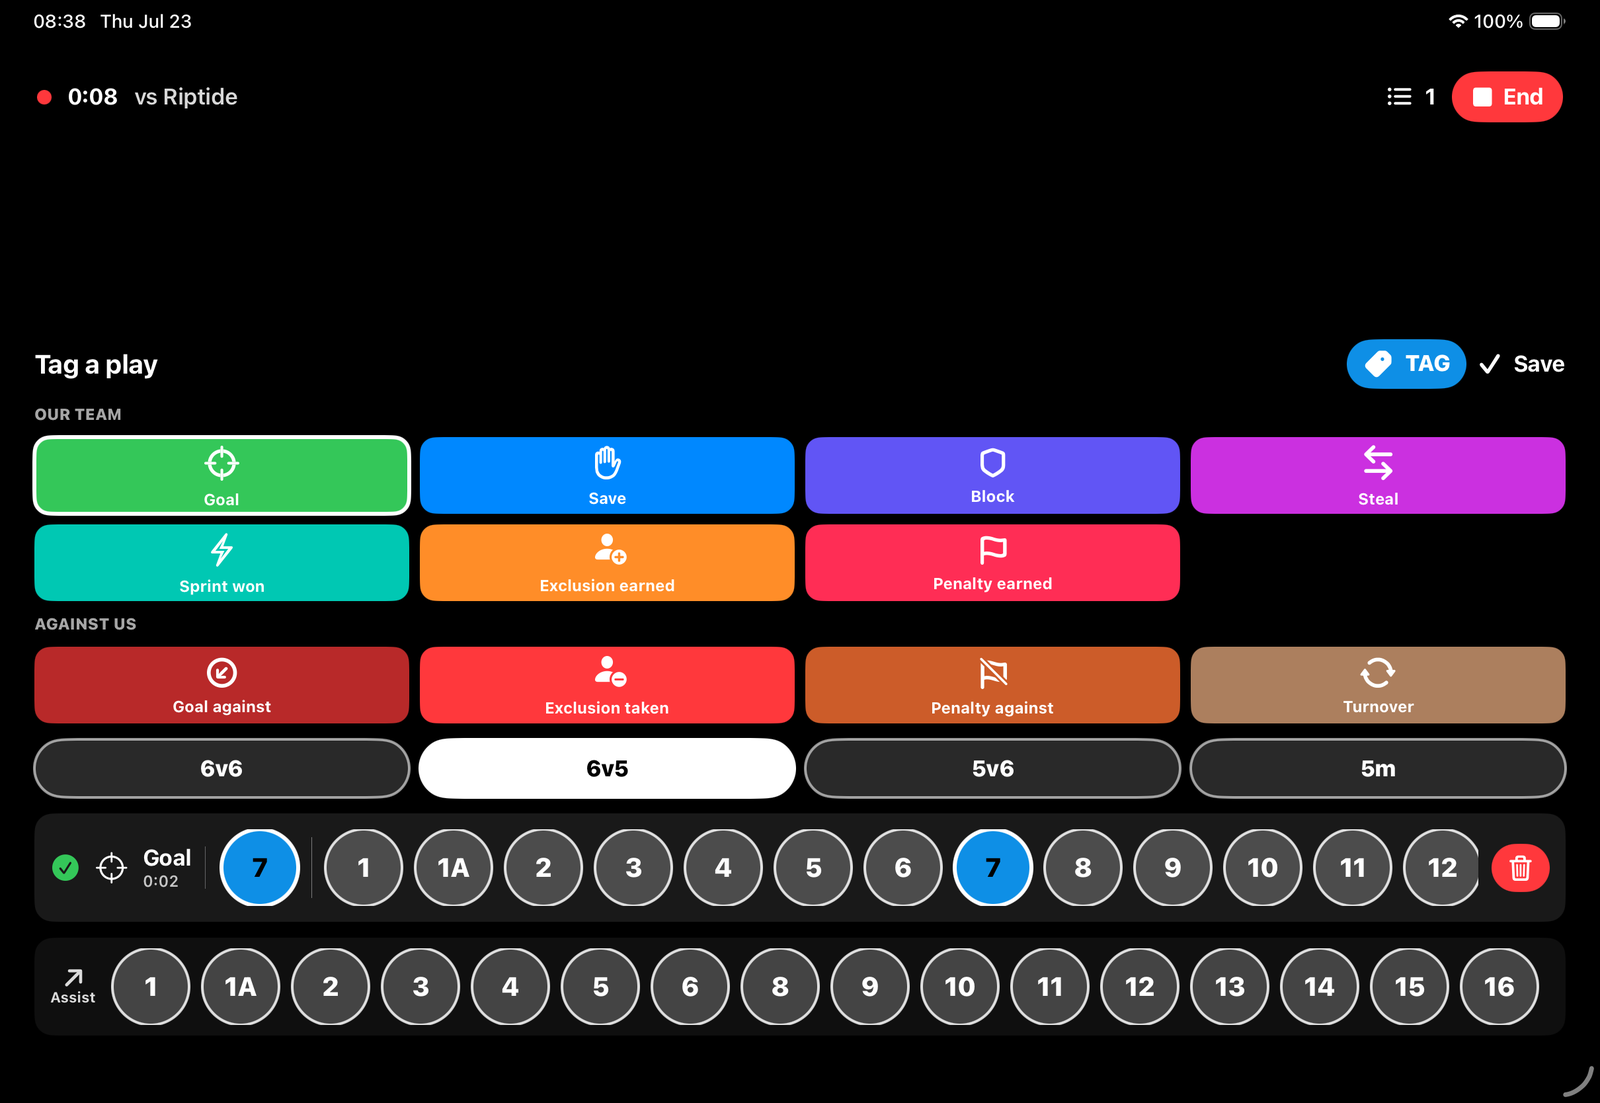
Scored off a nice pass? Tap the goal, the scorer, then the passer in the Assist row underneath. One clip credits both players, and the reel label shows the assist too.
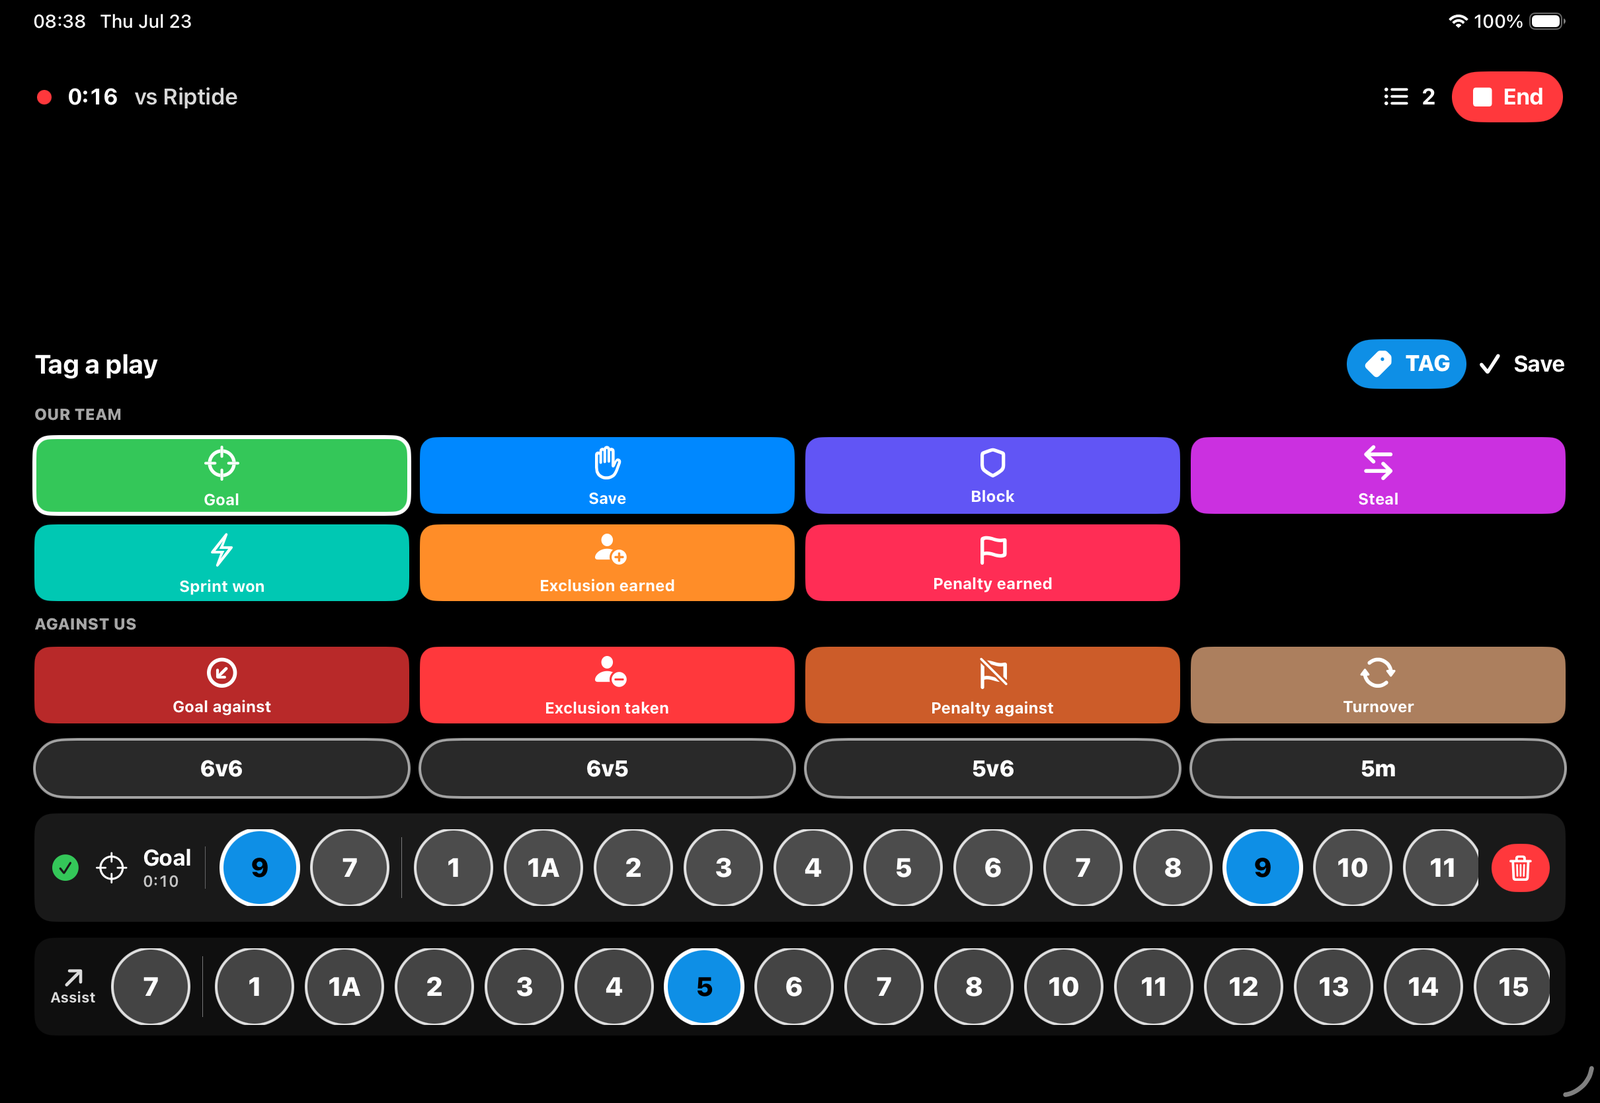
4 Save & carry on
Tap Save and the labels clear for the next play. Fumbled one? The Moments list lets you fix or delete any of them, during the game or after. And if two things happen back to back, an exclusion then the goal, tap TAG right there in the open palette: the new moment is captured and you can finish the labels whenever.
After the game, a blue bar counts the moments still missing a play, a player, or a situation. Tap it, and tap each moment to fill in the details calmly. Your reel waits for you.
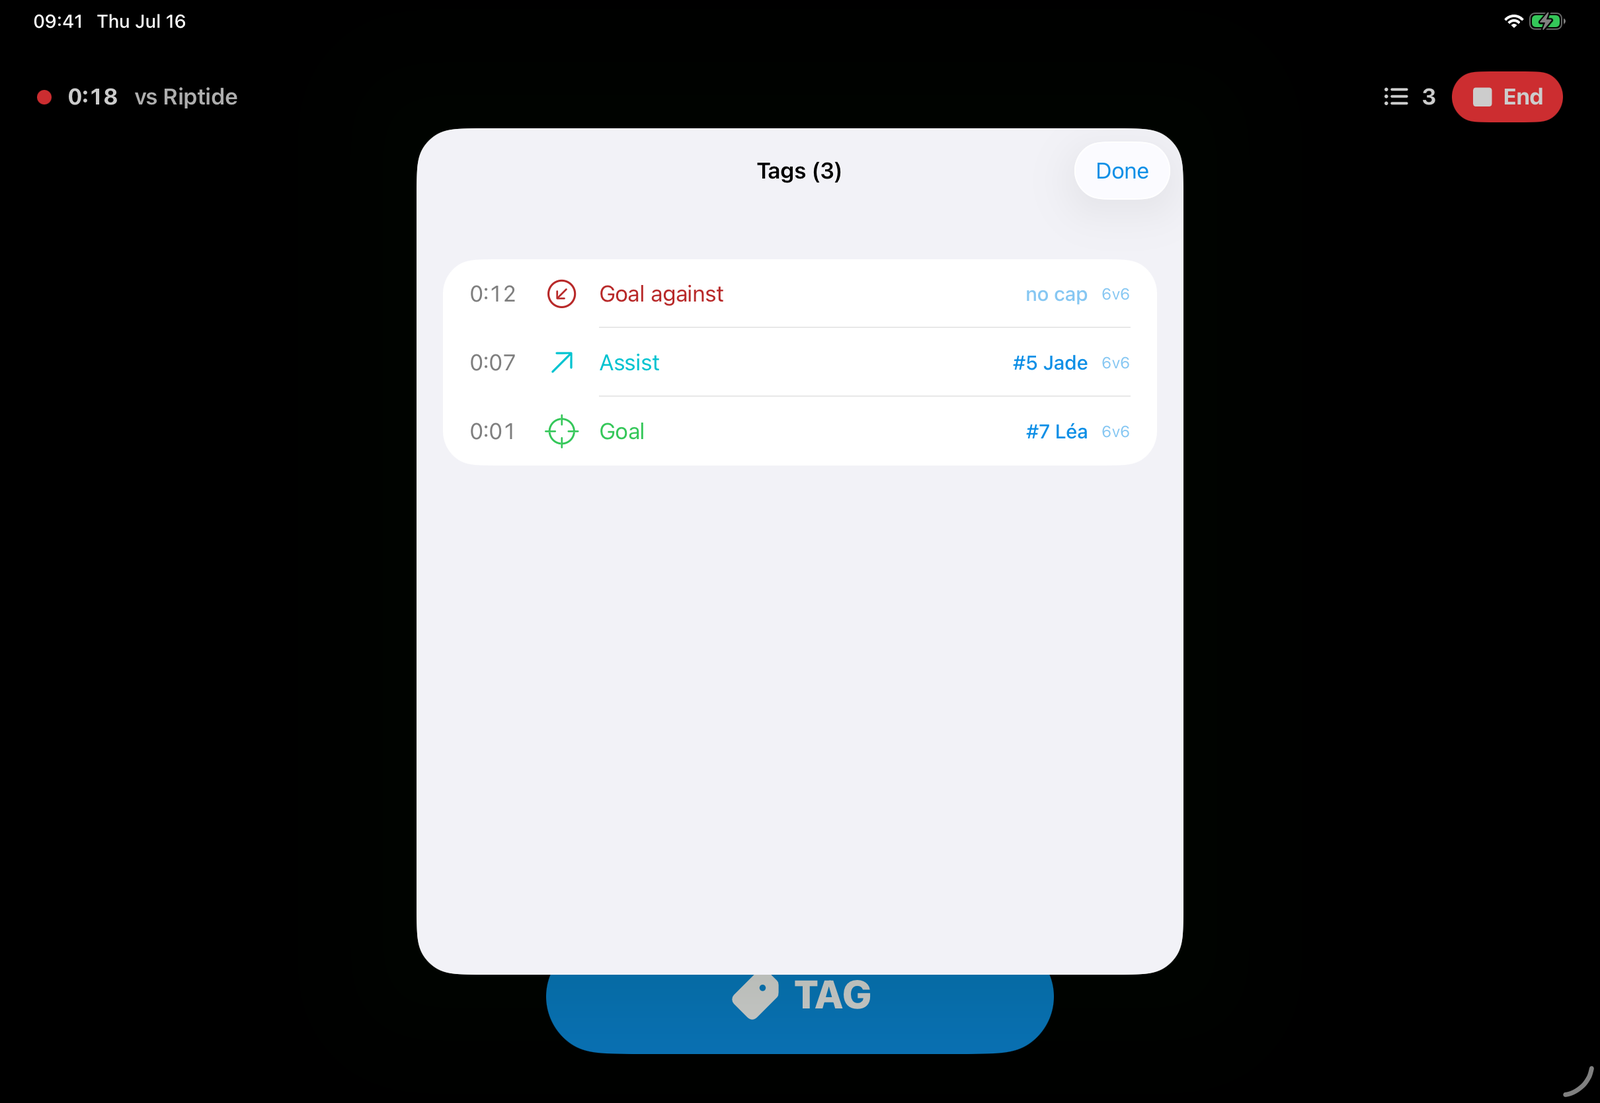
5 End at the whistle
Pause and resume whenever you need, halftime included. When the game's over, hold End for one second. The fill sweeps across, your clips cut themselves, and you land on the review screen. A quick tap on End does nothing but remind you to hold, so a stray finger can't end your game.
Ended too soon? Tap Resume game at the top of the review screen and keep filming. Same game, nothing lost.
Tips
- Tap the screen to focus past sun glare on the water.
- If a phone is also filming, tagging keeps working even while the iPad is paused.
- If a call or a screen lock interrupts recording, it pauses and shows a big banner. Tap it to resume. Nothing you already filmed is lost.
- Worried you'll miss the action while you fiddle with the app? You don't have to tag live at all. Film first and tag afterwards, from the sofa: section 8.
5 Get your reels
Review, fix, and share, right there on the pool deck.
1 Review your clips
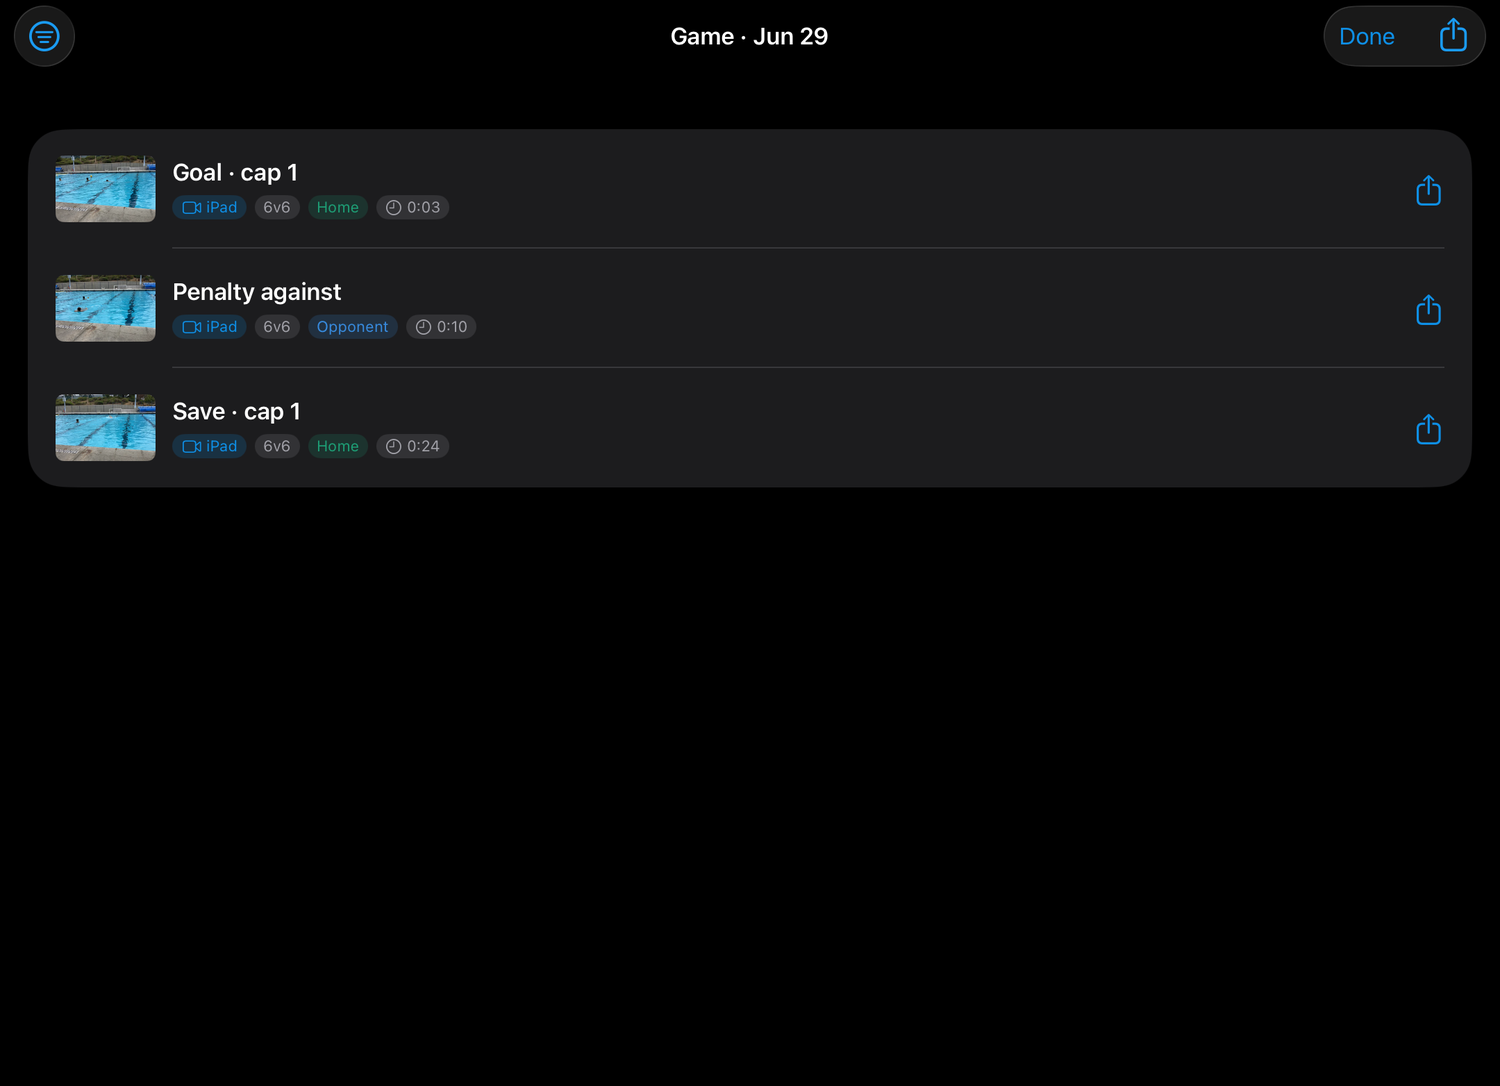
After you Stop, you land on the review screen: a clip with a thumbnail for every moment you tagged. If a phone filmed as a second camera, that moment shows up once per angle, and a small badge names which is which.
2 Fix a moment
Tap any clip to open the moment editor. Change the play, cap, situation, or assist, trim the length, or delete it. Relabeling is instant, with no re-cutting. A blue needs details bar counts what's left to fill in, and taking it to zero is oddly satisfying.

3 Build a reel
Tap Build reel. Filter by plays and players, tick the exact clips you want, then drag them into order. Lead with the best play.

4 One-tap player reel
Want one player's highlights on their own? Tap Export, then Player reel (this game), then tap a player. SplashReel builds their personal reel from this game.
Directly underneath it is Season reel, which does the same thing across every game they have played. That one is section 6, and it is the reel worth sending to a coach.

5 Share or save
Share the reel, or save it to Photos. Saving the full game? If you paused during the game it was recorded in parts, and SplashReel asks whether you want one joined video or the separate parts. Full games and clips are also in the Games list, and in Files → On My iPad → SplashReel.

6 One player's whole season
A game reel is nice. A season reel is the one a coach asks for, and SplashReel has been quietly building it for you every time you tagged a cap number.
1 Tap Players in the Library
It sits just above your games, next to Camera footage, and it tells you what it has: “8 players · season reels across 12 games”. Every player on your roster is listed, with your pinned player first.

2 Read the row before you tap it
Each player says what SplashReel actually found, like “12 clips · from 5 of 8 games”. The second half matters: it is how you spot a reel that is shorter than the season. If something is holding clips back, an amber line under the name says so.

3 Tap a player, then curate
SplashReel gathers their highlights from every game they played, oldest first, and opens the same composer you already know. Tick the clips that make the cut, drag to lead with the best play, then build. Each label names the game and the date it came from, so a coach can see the season take shape.

4 Cap numbers don't have to match
This is the part people don't expect. Your player can be #7 in October and #9 in February and it all lands in one reel, because SplashReel follows the player, not the number. Correcting a spelling later does not split the reel in two either.
5 Two things worth knowing
- A very long season reel loses its title labels. Past about 120 clips SplashReel builds the reel without the burned-in labels rather than risk the export, and it tells you it did. Narrow the date range, or tick fewer clips, if you want them back.
- Games from before SplashReel tracked players can only be matched by name. If a row says some older games can't be matched, open that game, tap Roster, and pick the team again. That links it properly and it joins the reel.
Other ways in
The same screen is inside every game, under Export → Season reel, right below Player reel (this game). There is also a date-ranged version in Settings → Teams and player names → your team → Season reel if you want only the last three months.
7 Add extra cameras Optional
Turn another parent's iPhone into a second angle that stays in sync. No Wi-Fi network needed.
Send this to the parent holding the phone
The steps below are written for you, the one running the game on the iPad. The parent filming for you has their own page, Someone asked you to film, with nothing on it but their four steps and the two things they always ask: no account, and their footage stays on their phone. Text them the link and you're done explaining.
1 Start on the iPad first
Start the game on the iPad first. It hosts, and it keeps the clock everyone else syncs to.
The iPad shows a yellow camera code: four digits, on the New-game card and in the top bar for the whole game. Read it out to whoever is filming for you. Only phones that type it can join, so a stranger on the deck can't slip into your game. Tap the code in the top bar to blow it up if someone's reading it from across the pool.
A new code every game. Parents turning up at half time can still join, because the code is right there in the top bar.
2 Join as camera
On the other phone, open SplashReel and tap Join as camera. Keep Wi-Fi ON (no network needed) and allow the Local Network prompt.

3 Type the code, then tap your game
Tap the four digits from the iPad into the keypad, then tap your game in the list. Each one is listed by game and team, like "vs Riptide · 16U White", so you can't join the wrong one when three clubs are running the app on the same deck.
Wrong code? The phone tells you, and you can type it again straight away. If it still won't join, both devices need the same version of SplashReel, because a phone on an older version can't join at all.

4 Wait for “Synced,” then film
When it says “Synced ± N ms,” you're locked to the iPad's clock. Record and stop on your own. Every tagged moment comes back to the iPad on its own, as a second angle.
Check the corners. When you tap Record, filming starts straight away and the picture opens out for three seconds to show you the whole frame, with “Check the corners of your frame” across it. Look at the edges, not the middle. A tripod clamp, a finger or the lip of a case creeps in from a corner, and it is very easy to film a whole game without noticing. Tap to skip it. If the frame is wrong, Stop and start again: you have lost a few seconds, not the game.
While you film, the screen is a viewfinder. The buttons step aside and leave you the picture, a red dot, how long you have been filming, and Stop. Stop never moves. The chevron beside it brings everything else back for a few seconds, including Save my footage to Photos, so you can still change your mind mid-game.
Where your footage goes: everything you film stays on this phone, under Camera footage in the Library, listed as one part per run of filming. Only the short tagged moments are sent to the tagging device. Tap the stack icon in the top bar any time to play it back, save it to Photos, or share it.
If the phone locks or you switch apps, the link drops and a Disconnected banner appears. It rejoins your iPad on its own, or tap to rejoin, and your angles stay in sync.

If cameras won't connect
- “That code didn't work.” Check the four digits on the tagging device. It's a new code every game, so last week's won't do. Type it again and tap your game.
- Still refused with the right code? Both devices need the same version of SplashReel. Update them both from the App Store, because a phone on an older version can't send the code, so it can't join.
- Turn Wi-Fi ON on both devices (even with no network joined) and allow Local Network in iOS Settings.
- Keep the iPad on the review screen until the phone shows “all delivered.”
8 Film now, tag later
You never have to tag live. Film the game the ordinary way and tag it afterwards, sitting down, with the footage in front of you.
Two ways in
- You already have a video. You filmed it on your phone, or another parent did, or it's been in Photos since last season. Import video turns it into a game you can tag.
- You filmed with SplashReel but didn't tag much. You were watching your kid, or you missed a few. Open the game and tap Review & tag.
1 Bring the video in
In the Library, tap Import video, then From Photos or From Files, and pick the video. Anything your phone or a normal camera app shot will do. If someone sent you the game over AirDrop, it'll be in Files.

2 Name it and pick the roster
SplashReel asks for a game name and which roster it was played with, before it imports anything. It's the same question the new game card asks, for the same reason: those player names are saved with this game, so its clips and reels read “#7 Léa” and stay that way even if you rework the roster later. Pick No roster and you'll get plain cap numbers.
One team? It's already picked, so just name it and go. Picked wrong? Open the game and tap the Roster button to switch it afterwards.

3 Let it copy
A bar shows how far along it is and what it's doing. Your video is not re-encoded, so nothing is lost and it's quick. An unusual format has to be converted instead, which says so and takes a good deal longer. Either way, leave the app open.
A video that still lives in iCloud has to come down first, so a slow start is normal. SplashReel keeps its own copy of the video, so you need roughly as much free space as the video is big.
4 Tag by scrubbing
The video opens ready to tag. Drag the slider to find a moment, or use play, the 5-second jumps, and the single-frame arrows to land on the exact instant. Then tap TAG. The video pauses and the labels open.
The labels are the same ones you'd use at the pool: your team's plays and things that happened against you, the cap row with your pinned player first, situation chips on goals and saves, and the Assist row on a goal. Nothing is guessed for you, so a goal you don't classify stays honestly blank. Tap Save and it clears for the next play.
Tag the moment itself, not a few seconds after it. Each clip still keeps about 8 seconds before your mark and 4 after, so the build-up is in there.

5 Tap Done
Done, top right, cuts every moment into a clip and takes you back. Open the game and you're on the same review screen a filmed game lands on: thumbnails, the moment editor, Build reel, one-tap player reels.
Backed out with Close instead? Your moments are saved, they just have no clips yet. The game screen offers to make them for you with a yellow Generate bar.
6 Or fix a game you already filmed
Same screen, different door. Open any saved game and tap Review & tag at the top. Scrub through your own footage and add the plays you missed, in the quiet, after the game. What you already tagged is left alone, and if you paused during the game the parts play back as one video.
To fix a moment rather than add one, go back to the review screen and tap its clip. That's where you change the play, the cap, the situation, or trim it.

What an imported game has, and what it doesn't
- One camera. An imported game is the single video you brought in. Phones can't join a game that already happened, so there are no second angles.
- Everything after that is the same. Clips, the moment editor, trimming, zooming in on a clip filmed from too far away, the needs-details bar, reels, one-tap player reels, and a player's season reel across games.
- It keeps its own date. SplashReel uses the day the video was filmed, when the file remembers it, so the game lands in the right place in your games list and in a season reel.
- Adding a moment later to a multi-camera game gives you one angle. The phones sent their clips live, during the game, so a play you tag afterwards is cut from the tagging device's footage only.
- Hold the camera sideways if you can. A portrait video imports and tags fine, but it sits awkwardly in a reel next to sideways clips.
- Deleting the game deletes SplashReel's copy. The original in Photos or Files is untouched.
Something not right?
- Tell us: use the contact page and pick "Something's not working." Your version and build from Settings > About help us most.
- Send logs: if something acts up, go to Settings > Share diagnostics and attach the file.
- Every game stays on your device. Nothing gets uploaded.